 |
| Starting our day working the "Shark Attack" roof. |
It was probably my first visit to Calico Basin when I noticed the huge impressive roof gashed out of the side of Kraft Mountain. How could you miss it!? The intimidating roof is probably one of most obvious features on the mountain, and it looks big even from the parking lot. Needless to say this thing looked like a bold line destined for an ascent, and I was curious to investigate. For a while every time I went to the Kraft area I would find myself starring at it daydreaming the impossible and mysterious ways it might be climbed. How wide does it get? Can you tunnel through? Is it an off-width roof traverse? Do you have to go inverted? Will there be any bats? Is it even possible? Maybe it's a space portal into another dimension? A million questions ran through my head, and most of the answers I made up were pretty exciting. So about a week ago Jason, Ken and I hiked up to the base of the climb one more time, doing our best to look inside to evaluate what kind of gear it would take. The excitement grew, the rock was discussed, and the route was planned. It was soon decided the next time we came back to the roof that we'd attempt to get an ascent.
 |
| The roof from the trail. |
The first pitch looked a little broken up. The crack running up to the base of the roof looked pretty good, but the stone around it was questionable. There was no doubt we were going to knock off loose rock, but how much and where would it land? There was even a pretty good chance what you were holding onto could easily rip off the wall, and even some of the gear had a possibility of ripping. On an attempt like this there are no bolts, no chalk marks, no route description, no beta and no guarantees... once we left the ground it is full on rock climbing. This climb is certainly more committing and serious than the average climb, there is a lot more that goes into the process. One has to consider how they protect the climb, how and where to set up anchors, and how will you get off the climb or what if you have to bail? A lot more gear is needed when you're not sure what you're getting into, and it shouldn't be a surprise if some of the gear gets left in the rock for temporary fixed anchors. To top it off we brought a lot of wide gear to protect the huge gash above, requiring us to haul a bag full of gear and supplies to the base of the roof. Our rack consisted of a single rack from #00 C3 - #4 C4 with double #5 and #6, #3, #4 and #5 Big Bro, micro nuts, 10+ slings and a bunch of cordalette and webbing for potential rap stations or belays. A hefty load in addition to the standard water, food. camera and tons of psych.
 |
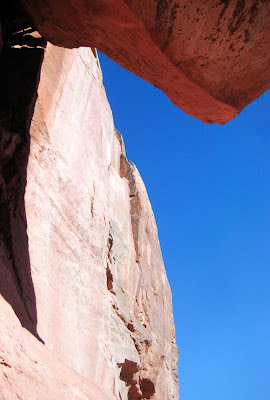
| Getting the first close view under the roof from the pitch 1 anchor. |
So I carefully climbed the first pitch, paying extra caution as to not hold or stand on any rock of extremely poor quality. I was placing more gear than I normally would, but with questionable rock quality I didn't want to take a risk if I were to fall. I took the path of least resistance up the wall, and the climbing felt no harder than 5.8, with a slightly harder crack portion that would make it around 5.9. After about 50' of climbing, a slight ledge is reach about 15' below the roof. I stopped here to build a belay off large nuts and medium sized cams. It was then I got my first look into the depths of the shark's jaws, and could see what I was in for.
Some footage by Ken that I edited together.
 |
| You may ask yourself "How did I get here?" |
Overall the climb was an excellent adventure with a side of thrashed elbows and knees and a medium to medium-high chance of pooping your pants. I'm pretty elated having even completed this wild ride and coming out in one piece. It's nice to know that what once was a thought to climb an inspiring line can actually turn into reality. Weather the climb has been done before or not is a question that is at times hard to answer. But based on the amount of untouched stone that broke off, and the general intimidating nature of the climb I am thinking it hasn't been climbed in this style previously. As of now this route is still a pretty serious pursuit, and until we do a little more cleaning and improve the top anchor slightly it is not a great destination with those new to multi pitch traditional climbing. Although this thing is super wide and takes some of the largest gear on the market, don't attempt it without micro nuts, as they are key in building the belay above the roof. More information with be shared about this project as it becomes a little more accessible, and I look forward to eventually walking into Kraft and seeing someone once again climbing up into the massive roof.
| View from under the roof at the first belay. |
Thanks to Ken Rathcke for the photos and video from our ascent that day.


No comments:
Post a Comment